How to Prevent Layer Shifting


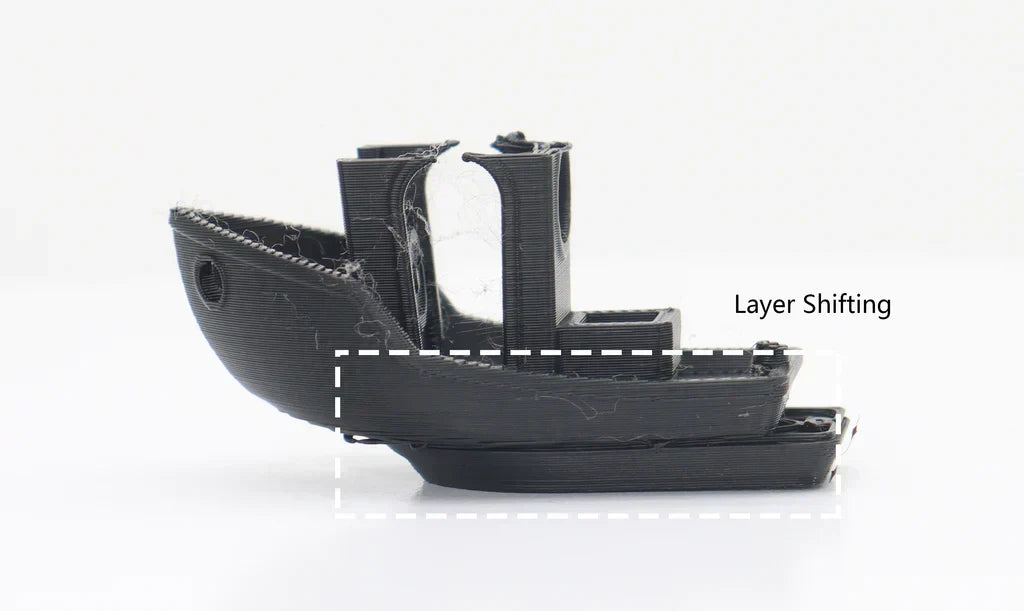
A layer shift is one of the most noticeable failures in 3D printing, creating a distinct stair-step effect that ruins an otherwise good model. This problem happens when the printer loses its exact position along the X or Y axis, causing all following layers to be misaligned. It’s a frustrating waste of time and filament, but the good news is that it's nearly always correctable. This guide will walk you through the common causes and provide a straightforward process to diagnose and fix the issue for good.
1. The Common Reasons for Layer Shifting
A layer shift means the printer's toolhead has lost its place and is no longer where the machine's software thinks it is. This doesn't happen for no reason; the problem can almost always be traced back to a specific issue. Understanding the potential causes first will help you troubleshoot much more effectively than just randomly tightening screws.

The problems typically fall into one of four categories:
- Mechanical Issues: This is, by far, the most common reason. It includes anything that physically obstructs movement, like a loose belt slipping on its gear or a piece of debris jamming a guide rail.
- Motor or Electrical Faults: The stepper motors might not have enough power to make a move, or the electronics controlling them can overheat. In either case, the motor fails to complete its commanded movement, and the printer's position is lost.
- Collisions with the Print: The nozzle itself can crash into the printed object. This often happens if a corner of the print has curled upwards or if a stray blob of plastic has hardened on the surface. A hard impact can easily force an axis to skip.
- Software or Data Errors: While less frequent, the G-code file that tells the printer how to move can be corrupted. This can be caused by a faulty slicer or, more often, a failing or low-quality SD card.
2. Check and Tighten Belts and Pulleys
The belts and pulleys are responsible for turning the motor's rotation into precise X and Y movement, so their condition is critical for print accuracy. Since mechanical issues are the top cause of layer shifts, these checks should be the very first thing you do.
Belt Tension
A belt needs to be properly taut—not so loose that it can slip on the pulley's teeth, but not so tight that it puts unnecessary strain on the motor. An overly loose belt will cause lost motion, while an overly tight one can strain the motor bearings and also lead to skipped steps. The correct tension should feel firm with very little give when you press on the longest span of the belt. If your 3D printer has tensioner knobs, this is an easy adjustment. If not, you will likely need to loosen the idler pulley's mounting bracket, pull the belt taut by hand, and then re-tighten the bracket.
Pulley Security
The drive pulley is the small toothed gear attached directly to the motor shaft, usually held in place with one or two tiny grub screws (also called set screws). If these screws are even slightly loose, the motor shaft can spin without fully gripping the pulley, which is a classic cause of layer shifting. Use the correct size Allen key to make sure these are snug. Crucially, one screw must be tightened against the flat part of the motor shaft to ensure it cannot slip. While you're there, look down the path of the belt to confirm the pulley is perfectly aligned so the belt doesn't rub against its side walls.
3. Inspect and Lubricate Motion Components
Having inspected the belts and pulleys, your next task is to make sure that all your printer's moving components are freely moving. Any additional friction in the system makes the motors work more, and that makes them skip steps and result in a layer shift. The inspection is straightforward.
First, clean the smooth metal rods and Z-axis lead screws with a lint-free cloth to remove old dirty grease and dust. Then reapply the proper type of lubricant. For the smooth linear rods, a light machine oil will do, but for the threaded lead screws, apply a thicker white lithium or PTFE-based grease. With everything lubricated, move the axes by hand through their complete range of motion. It should be free, with no grinding or binding spots. If you do find binding or grinding, it may be a more critical problem such as a worn bearing or a bent rod that will require replacement.
4. Check Stepper Motors and Drivers
If you have inspected the belts, pulleys, and guide rods and you still experience layer shifts, the issue has to be electrical in nature. Either the stepper motors themselves or the driver chips on the mainboard that operate them may be at fault.
Overheating Components
Stepper motors will certainly become warm when in use, but they should not be hot to the point where you cannot touch them for a second or two. A more likely suspect, though, is an overheating stepper driver chip on the printer's mainboard. These chips typically have tiny heatsinks on them. When the fan clearing the electronics enclosure is clogged with dust or has failed, the drivers may get hot enough to temporarily shut down in order to protect themselves. This temporary glitch takes power away from the motor, and the motor misses steps. Make sure your electronics fan is clean and spinning freely.
Motor Current (Vref) Adjustment
For ongoing and unexplained drifts, the motor current may be set wrong. This setting, also referred to as Vref, controls the level of power being delivered to the motors. If it is not supplied with enough current, they become weak and will skip. Too much current will overheat both the motors and drivers.
Vref adjustment is a higher-level troubleshooting technique that requires you to use a multimeter on the mainboard while it is powered on. This is a tricky procedure with a very real risk of shorting and ruining your printer's mainboard beyond repair if you don't do it precisely correctly. You must locate and read a step-by-step tutorial or your printer model's official manual before trying to do this. For the majority of users, this should be reserved as a last resort.
5. Secure the Print Bed and Frame
A printer's stability is its foundation. During rapid print movements, even a small wobble in the frame or bed can introduce tiny errors that eventually add up to a significant layer shift. This effect is magnified if you already have a borderline mechanical issue, like a slightly loose belt, as the vibrations from the wobble can make the belt slip more easily.

Frame Rigidity
Go over your entire printer and check that all the structural screws holding the frame together are tight. This is especially important for printers that you assembled from a kit, as screws can loosen over time. A rigid frame resists vibration and ensures the motion system's geometry stays perfectly aligned, which is essential for accuracy.
Bed Stability
Next, check the print bed itself. Try to gently rock the bed with your hand; there should be absolutely no wiggle or play in it. Many printers use a carriage system with wheels that ride in aluminum extrusion channels. These systems almost always have an "eccentric nut" on one of the wheels. This is a hex nut with an off-center hole. Turning this nut with a wrench will move its wheel closer to or further from the frame, allowing you to tighten the carriage and eliminate any wobble.
6. Avoid Collisions with the Print
Even with perfectly tuned hardware, layer shifts can still occur if the nozzle collides with the print itself. This happens when parts of the model get in the nozzle's way during its high-speed travel moves across open spaces.
The Cause: Warping and Print Artifacts
There are two common culprits for this. First, the edges of a print can cool, contract, and lift off the build plate—a problem known as warping. Second, small blobs or strings of plastic can form on the model's surface, often due to imperfect retraction or temperature settings. If the nozzle, moving at high speed, hits one of these solid obstacles, the impact can easily be enough to knock a motor off its path.
The Solution: Z-Hop and Better Tuning
The most direct fix for this is a setting in your slicer software (like Cura or PrusaSlicer) called Z-Hop. This feature simply lifts the nozzle by a small amount before it travels, allowing it to safely clear any minor bumps or curled edges.
Additionally, you can address the root causes to prevent the obstacles from forming in the first place.
- To prevent warping: Ensure you have excellent bed adhesion by thoroughly cleaning the build surface or adding a brim or raft to your print.
- To prevent blobs and strings: Fine-tune your retraction, temperature, and extrusion settings. This will result in a cleaner print surface with fewer obstacles for the nozzle to hit.
7. Reduce Print Speed and Acceleration
While not a root cause, high speed can expose other weaknesses in your system. Running a printer at very high speeds with aggressive acceleration puts a lot of stress on the mechanical parts. If you have a slightly loose belt or minor friction in the system, it might not be a problem at slow speeds, but it can quickly lead to skipped steps when the printer is trying to make rapid direction changes.
If you suspect this is a factor, simply try reducing the overall print speed in your slicer by 20-25% for your next print. If that resolves the shift, you know the problem is related to mechanical stress. For a more targeted fix, you can lower the "Acceleration" and "Jerk" values in your slicer or printer firmware. This gives the motors more time to perform their movements accurately.
8. Use Calibration Prints for Testing
After making an adjustment, don't waste hours on a large print just to see if your fix worked. Instead, use a small, fast test model. The classic XYZ Calibration Cube is perfect for this; it prints quickly, and its sharp corners and flat sides make any layer shift impossible to miss.
This method allows you to be systematic. When you see a shift in a test print, apply one potential fix at a time—for example, tightening a belt or adjusting an eccentric nut. Then, print another cube.
- If the shift is gone, you’ve confirmed the solution.
- If the shift remains, you can undo your change and move on to the next likely cause.
This iterative process is the most efficient way to pinpoint the exact problem without wasting a lot of time or 3D printer filament.
Establish a Routine for Reliable 3D Prints!
Fixing layer shifting comes down to being proactive. By regularly checking your printer’s belts and motion system, keeping components clean and lubricated, and using reasonable print settings, you can address most problems before they cause a print to fail. Treat your printer like any other tool that requires occasional maintenance. This simple, routine approach is the best way to ensure your machine operates reliably and produces the quality prints you expect.


 Q2
Q2
 QIDI Box
 Plus 4
 Q1 Pro
 X-Max 3

